Showing posts with label diy. Show all posts

Thursday, March 29, 2012

Clay Jewelry


This is a March of the Bloggers guest post!

"Clay Jewelry"

by Jessica of Jagsmitty

***

We're almost to the weekend, girlies! That means finally some time to go shopping, have tea with friends, and catch up on all those lovely DIYs you've seen on blogs throughout the week!

Today's great DIY project comes from Jessica of Jagsmitty. Her blog covers the range of fabulosity... from fashion to DIY! Let's jump in to her awesome demonstration of clay jewelry!

***
First, I want to start off by saying thank you to Loren of Frock Stock for asking if I would like to guest post. I feel very honored. I love Frock Stock, it’s such an adorable boutique! Cute clothes and fast shipping too!
Now to jump right into my post! I would describe myself as queen of everything DIY. If I can make it, most likely I will. The best part of DIY is you get to put your own spin on whatever it is YOU make! Which means it’s unique and nobody has anything like it.
My post, as you know by now from the title is about making jewelry out of clay and other items. With a few simple ingredients (and of course a little bit of creativity) you can do magical things!

Supplies: ‘clay,’ toothpicks, acrylic paints, paint brush, beading wire, jewelry pliers, old necklace chain or store bought chain.

The recipe I use for my clay jewelry is one that can probably be found anywhere. It calls for: 2 cups flour, 1 cup salt and enough water to create a ‘play-do’ consistency. Once you get this far, let your imagination run! You can make just about anything. An idea that I haven’t yet done myself is find objects in your house that have unique textures on them. Roll them over your flattened clay and cut out objects.

Once you have your shapes ready place them on a cookie sheet. No need for foil as they bake so long they won’t stick. Using a toothpick, poke holes in your shapes where you would like them to be threaded. Bake them at 250⁰ F for 2 hours. After they have baked and cooled you can start decorating!

Acrylic paints seem to work best with the clay. You will have to apply more than one coat as it does soak up the paint slightly. Get creative! There are so many colors to choose from! Including glitter and metallic!

To attach the shapes to a chain, I used beading wire that I cut and twisted with jewelry pliers. I did this so that the shapes did not hang funny on the chain. You can see how I did this in the photo below.


So simple right? And definitely a lot of fun! I’m thinking about having a jewelry-making party with my friends! I think the trickier part in this whole process is coming up with ideas. Here are a few completed necklaces I did thus far!


Enjoy! And I hope I sparked the creativity in you! I would love to see projects any of you do, so send me your links to photos! :)


***
As someone who doesn't DIY a lot, I honestly have to say I had never heard of doing clay jewelry but I think the items Jessica made are AMAZING. It's such a cheap way to imitate anything you've been coveting!


Don't forget to check out Jessica's blog once you're done leaving her some comment love! (Three more days until our last jewelry giveaway!)

<3 Loren of Frock Stock

Tuesday, March 20, 2012

DIY Scarf

This is a March of the Bloggers guest post!

"DIY Scarf"
by Megan of Diary of This Girl

***


Good morning, Frock Stalkers! We've got another awesome DIY post on the blog today so get your crafting cap on!


Our guest blogger today is Megan, who runs a blog that follows her life and style thoughts. Her DIY project today is something that anyone can do and doesn't cost a dime! Got those scissors ready? Let's read!


***

DIY spaghetti + braided t-shirt scarf


Hi there! My name is Megan, and I am the girl behind the blog at Diary of this Girl.
I would like to share with you how to make your own t-shirt scarf,
As it is an incredibly simple and inexpensive accessory to add to any outfit!


To begin, you will need a men’s size XL t-shirt and pair of scissors.
(You can use a size L shirt, but I prefer XL so the scarf is longer.)


Start by laying out the t-shirt.
Cut horizontally across the shirt, just under the armpits.
Then, cut the bottom hem off – we will not use the hem, so you can throw it away.


Set aside the top part of the shirt.
Fold the body of the shirt in half, from left to right
And begin cutting one inch strips.
I usually aim to have at least nine strips, but if you end up with more, that is okay!


Next, take each loop and cut it in half.
You will end up with 9+ long strips of t-shirt.
Next, secure the strips with one strand of the t-shirt (see below).
Allow enough space on top to later tie the scarf together.


Now you can begin braiding the strands to the desired length.
With this scarf, I decided to braid half, and leave half loose.
This step allows for flexibility and creativity.
Simply braid as much as you like!
Next, secure the bottom of the braid with one strand – simply loop the strand around the bottom of the braid, and tie in a knot.


Once the braid is secure, take the bottom strands and stretch them.
This will lengthen the scarf, and hide any uneven cutting.
The loose ends will begin to curl, giving the strands the appearance of spaghetti.


Finally, take the top portion of the t-shirt, and cut one last strand.
You can use this to secure both ends of the scarf.


The finished product should look like this!
I typically wear the loose ends of the scarf behind my neck,
But you can play around to see which way you like best.
As you can see, this is a simple craft that can be worn with any outfit.
Please let me know if you have any questions,
But I believe it will take longer to read my tutorial than to finish your own scarf 
Feel free to check out my blog for other scarf and crafting tutorials!


***

I love recycling old clothes and making them into something totally new! Spill something on your favorite printed dress? You can totally turn that into your new favorite scarf instead of throwing it away.

Thanks Megan for this awesome post! Check out her blog here and leave her some comments for a chance to win some free jewelry!


<3 Loren of Frock Stock

Monday, March 19, 2012

Rustic Pillow Stencil

This is a March of the Bloggers guest post!

"DIY: Rustic Pillow Stencil"
by Sara of House Bella

***
The weekend holiday might be over, but we've got a fun blog post today for you, so don't despair!

Our guest blogger today is Sara of House Bella. Sara's blog makes me so envious of her amazing life. She lives in a beautiful mountainous area of Idaho with her husband Mike. Together they blog on House Bella about the trials and fun of sprucing up their first home. She's here with a great DIY project she did for her home that you can easily bring into your own!

***


Hello Frock Stock blog readers! I am so happy to be joining you today.

I'm a home design blogger who loves simple, beautiful DIY projects. I crafted this rustic glam pillow using my limited sewing skills, craft paint, and clip art. The possibilities for design are endless (if elk aren't your thing). Let's do this!


Pillow covers are an inexpensive and customizable way to transform a pillow. They require a small amount of fabric and the ability to sew in a straight-ish line (here's a straightforward tutorial from Curbly). I used a medium weight white demin.


I wanted an animal silhouette to play off my elk antlers. I searched a few free clip art sites before finding the right design. After enlarging the clip art to my computer's max capacity, I placed a piece of thick (100#) cardstock right against the screen and traced.


Using an old catalog as a cutting mat I sliced out the silhouette. I found an X-Acto knife was the best tool for the task. To protect the back of the pillow cover, I slipped the cutting mat inbetween the layers of fabric.


Delta Ceramcoat Textile Medium is one of my more awesome finds. It can take any acrylic paint and turn it into washable fabric paint. Amazing, no?


The ratio is 2 parts paint to 1 part textile medium. My paint was Delta Ceramcoat Gleams in Metallic Kim Gold.


Keeping the stencil firmly against the fabric, I blotted on the paint mixture using a foam brush.


I pulled away the stencil and there it was, in all it's gilded-rustic glory. The textile medium recommends a heat set, so I ironed the pillow - paint side down on a towel - on the cotton setting with no steam.


The paint needs to set seven days before washing. Once it was fully dry (a matter of minutes), I slipped the cover back onto the pillow.


Thank you for including me Loren! Readers, let me know if you tackle one of your own, I'd love to see it! You can find me at House Bella, or on Twitter.


***

Not only do I love this post but I love the whole basis behind the House Bella blog. Being in my young 20s, I'm hoping to be sprucing up my own real estate one day soon, and I'm definitely going to be reading her blog for more tips!

You can read more about Sara's house projects and lifestyle on her blog. Don't forget to leave her nice comments if you loved her post! (Comments are the road to free jewelry!)


<3 Loren of Frock Stock

Sunday, March 18, 2012

Vintage Jewelry Remade


This is a March of the Bloggers guest post!

"Vintage Jewelry Remade"
by Carrie of LadyLuxe Designs 

***


Hope everyone had a fun holiday yesterday! We've got a really cool blog post for you today, so snuggle up with some tea and get ready for some great DIYing. Our blogger Carrie runs a fabulous blog about her own jewelry and accessory creations. Carrie's concept today is all about taking old jewelry that may have lost its appeal and turning it into beautiful new jewelry. Wait until you see this awesome piece she made!

***


Are you a DIYer? Do you like challenges? Well, I definitely love a good challenge, which is why I enjoy jewelry design. I love using a vast variety of materials for my creations. Vintage supplies are some of my favourite materials to work with. I love the challenge of taking something that has definitely lost its "cool factor" and breathing in some new life. Let’s take these vintage earrings below, for example. To the naked eye, they're - well - pretty ugly. My challenge was to see beyond their ugliness, incorporate them in a piece of jewelry, all without tossing them out.


First, I began by cutting the backs off each earring or pin, with a simple wire cutter.


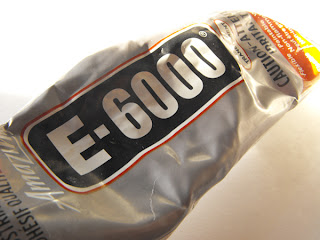
Using a silver wire bracelet as a base, (purchased at my local Dollar store), I began to glue each earring and pin to the bracelet. The BEST glue for metal material, in my opinion, is E6000.


OK. I know what you’re thinking. This is still pretty ugly, right? Well, I would agree, which is why I broke out my Krylon Silver Metallic spray paint.


Once the glue was dry on the bracelet, I spray painted it with a couple of coats of paint, and finished it with the clear coat.


Then, I got really crazy! I used another bracelet I purchased from the dollar store, cut it apart and glued the gems on the base of my new piece.


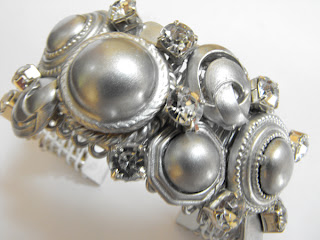
Here’s the finished product!


Now I have a new piece with some texture and sparkle! The moral of this tutorial is “waste not, want not”. Before you throw your old jewelry out, consider remaking it into something cool again.


***

What an incredibly cool concept. It ties into the last post about shopping for vintage... you could totally find old jewelry in a thrift store for this project!

Hope everyone loved the jewelry giveaway yesterday. We're giving out more this week so don't forget to leave some comments for Carrie with your twitter name or e-mail!

Once you're done with that, head over to her blog... you won't be disappointed!


<3 Loren of Frock Stock

Tuesday, March 13, 2012

DIY: Floral Headbands

This is a March of the Bloggers guest post!

"DIY: Floral Headbands"

***

Today's post is something extra special. It combines DIY crafting and beautiful vintage fashion in one. Tori is a girl whose endless imagination manifests itself in the form of style posts, craft projects, and a lovely Etsy shop on her adorably-named blog "Daisies and Pixie Dust." These are only a few of the notable things on her fascinating blog. Her creativity brings us a lovely little DIY headband in her guest post today.

***


During this past week, I’ve really taken notice of the arrival of spring. I could not be more excited- I love the sunnier weather and how everything is in bloom. I adore flowers and all things floral, so naturally I am head over heels in love with floral headbands. I’ve been making and wearing them so much it’s become a regular daily accessory for me. I’m going to show you how to make your own in a few simple steps.


Here’s what you will need:


These items can all be found in a grocery or craft store. Higher-end silk flowers are more expensive, but look more realistic. The ones I used are from the dollar store. Overall, this project cost me around 7 dollars for the wire, the tape, and the three different kinds of flowers. 

Step 1.
Wrap the floral wire around your head so that it creates a circle shape. Be sure that it fits comfortably on your head. Wrap around an additional two or three times to make it extra sturdy.


Step 2. 
Cut your flowers to the desired length. Take your first one or two flowers and place them in the desired direction against the wire circle. Use a small piece of wire (about 3 or 4 inches long) to wrap the flower tightly to the wire circle with the pliers or with your hands. Use the pliers to press down the ends so they don't stick out.


Step 3. 
Continue this process with more flowers, layering them next to and over one another until you feel like your headband is finished. (I left an empty area at the back of the headband, but if you choose, you can continue all the way around.)


Step 4. 
If you left an empty area on your headband, wrap the exposed wire tightly with the floral tape from end to end.


Step 5. 
Wear your new floral headband! 


***

Not only did I love the concept of this post and the headband itself, I also did a lot of gushing over the adorable photos Tori took! You can clearly see she's got a great creative mind in the way she sets up and edits her photography.

We'd love to see your end result if any of you decide to make this beautiful hairpiece! Either way you should explore more of Tori's fascinating blog and leave her some love in the comment box! Every comment you make enters you in the jewelry giveaway!


<3 Loren of Frock Stock